I’ve never actually had my own pulling blocks here at the house. If ever I wanted to do any work with blocks I either needed to head up north to the weightlifting gym, or stack up some bumper plates and use those as makeshift blocks. Stacking plates is alright in that at does allow for easy height adjustments, but the bar doesn’t really like to stay still when sitting on a bunch of plates. It’s definitely not ideal.
Well I recently decided that I wanted some real pulling blocks, but I wasn’t cool with buying the steel pulling blocks that you can find online. They’re much bigger and heavier-duty than they really need to be when only a couple people are using them. They’re a hassle to move around, and honestly they are just too big to store away in a garage anyway. Not only that, but at $700+ before shipping costs, they’re way too damn expensive.
The obvious solution was to just build my own. I figured it can be done in about a day, and it shouldn’t cost much more than $100 or so for the pair, so I gave it go. Turns out that pulling blocks are about the easiest thing in the world to make. It requires very minimal measuring and nothing but straight cuts. You need access to a few tools, but I think most adults have a saw and a drill in their garage anyway. Even if you don’t Home Depot will cut lumber for you for a nominal fee, so you’d only need to own a power drill. You better have a power drill.
If you take on this DIY project you’ll not only have access to some beefy pulling blocks, but you’ll have a solid platform for Bulgarian split squats, box jumps, step-ups, partial deads, box squats, floor presses, and so much more. A very versatile addition to your garage gym indeed.
Last update: January 2018 – minor spelling/grammar revisions.
DIY Blocks – Shopping List
- 3/4″ plywood – How much you need depends on what dimensions you want your blocks to be, and whether or not you plan to double-up the top layer (which I suggest you do.)
- 2×4″ lumber – Word is that pine is better than fir. How many you need depends on the dimension of the box obviously. Simple math, you can do it!
- Stall mat – just one; or scraps from previous install if you have them.
- Wood Screws – #8 2½” screws are perfect.
- Liquid Nails (for plywood pieces)
- Wood Stain (optional)

Should you stain your blocks? It’s totally up to you. I only stained mine so that they would match my platform. It added a couple hours to total project time though.
DIY Blocks – Recommended Tool List
- Power Drill/Driver
- A Saw appropriate for cutting 2×4’s and plywood sheets (table, chop/miter, circular)
- Tape Measure
- Utility Knife (for cutting the stall mat.)
- Safety Goggles
- Sander (optional; but you’ll probably want to sand if you plan to stain/paint.)
DIY Pulling Blocks: Assembly
My DIY pulling blocks are extremely easy to build. If you own the tools required to do this project then you probably don’t need to do much more than look at the pictures to figure it out. Matter of fact, I don’t think a project this simple requires super detailed, step-by-step instructions, so I’m going to keep this fairly brief. I’ll mostly be giving some pointers that’ll make the project simpler for the sake of perhaps making you aware of something you may not have yet considered yourself.
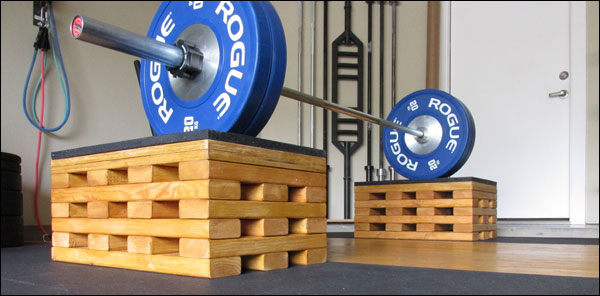
For starters, if you’re okay with your pulling blocks being 17½” wide by 24½” long, go with this size. Not only is this a good size functionally, but it’s the easiest size to build because it’s the exact dimensions of 5 side-by-side 2×4’s (17½”) and 7 side-by-side 2×4’s (24½”.)
By going with this size you can avoid any measuring during the assembly (not counting the cuts, obviously) since a scrap 2×4 is all that is needed to perfectly space each attached 2×4 (see image below.) Of course, you still need to correctly place the first 2×4 in each layer but once you do that the remaining pieces of that layer are easy.

Technically you can create any size that you can imagine; 17½ x 24½” is just super easy. I’m confident that if you choose to go with some other size that you can line up and evenly space alternating 2×4’s with relative ease by using a tape measure and basic math skills.
In terms of how high to make the blocks (how many layers to build up), that’s entirely up to you. The top layer along with the stall mat is about 2¼” high, and each layer of 2×4’s adds another 1½” inches. My blocks have six layers in addition to the top, but that may be too tall for some people (I’m 6’4″), so you may prefer four or five layers. If you’re clever enough you could make these adjustable, much like jerk blocks. I didn’t bother with that though.
Update: be sure and read the comments as some readers have left feedback and thoughts on making these adjustable.
When you start to assemble, I suggest starting with the top of the blocks and working down rather than building up from the bottom layer. This more or less guarantees that your first layer will be completely aligned with the plywood. Just lay the doubled-up plywood piece on the ground with the bottom side facing up and then just start attaching your layers of 2×4 to the plywood. Look at the sequence of images below to see what I mean; it’s pretty simple.

How many screws you use for each overlapping piece is up to you. I used two everywhere a piece of 2×4 ended up on top of another 2×4, and that came out to 24 total screws per layer! It sounds like a lot, but using only one screw didn’t seem like enough to me. Screws aren’t that expensive and I didn’t want any boards rattling around every time the bumpers touched down.
If you look carefully at the image below, you can see that whenever I started that next layer, I marked with an X where to place the screws so that the screws from the new layer weren’t going into the screws from the layer below.

Also, I used pilot holes for every screw. I know it’s a pain in the ass, but if you drive those screws straight into the board and it splits, you’ll be pissed.
Should you use wood glue and screws? I tried it; it seemed pointless when I realized I had 24 screws per layer, so I stopped using the glue. The only adhesive you should need is the liquid nails between the two pieces of plywood.
TIP: I suggest finding some way to make sure the boards are lined up precisely where they should be before attaching each piece permanently. If you just try to eyeball the placement of each 2×4 you may end up with uneven pulling blocks that have a funny look to them.
Personally I just propped up some scrap wood against the frame of the pulling blocks and butted each new piece up against those scraps to make sure everything was flush. Basically I had a makeshift fixture; or jig (not really the proper use of the word, but I hope it helps convey my point.)

I laid the blocks on my mat upside down and just traced the cut line with painters tape. Since the cuts were short and straight, I just used a professional utility knife to make the cuts.
Once everything is assembled, you just flip each block over, cut your stall mat pieces to the same dimensions as the top of the blocks and attach the mats. I screwed my mats down on the corners, but I may go back and use liquid nails between the mat and the plywood; we’ll see how it goes.
Voilà! Go lift and pull away!

Easy Peasy Lemon Squeezy!
Wanna Just Buy Instead of DIY?
This project really wasn’t that much work, so I really think these DIY blocks are the way to go. They’re cheap, strong, and can even be made to be attractive. Having said that, if you are so bad with DIY projects and power tools that trying to build these blocks is potentially hazardous to your health, maybe you should just buy some.
Most pulling blocks from retailers are steel, and that means they’re super expensive. Rogue Metal Pulling Blocks are available in two heights and have a number of features that make them better than DIY (including height adjustments), but you’re looking at either $800 or more. That’s a lot of cash to spend to get the bar a few inches off the ground.

They look badass, they can be adjusted, and they’ll last forever, but these steel pulling blocks from Rogue are pretty damn expensive at over $800 a pair (before shipping.)
Your best bet economically may be to buy sections of the Rogue Jerk Blocks. You can buy either the 6″ or 12″ blocks and then the 2¼” top, giving you either 8″ blocks or 14″ blocks. Not nearly as much height variety as the metal blocks, but it’s a hell of a lot cheaper. The 8″ blocks would set you back around $260 and the 14″ blocks a little over $300.

Using sections of jerk blocks as pulling blocks is a far more economical way to get that bar off the ground. If it’s only you and a buddy using these regularly (as in, not in a box setting) they too will probably last forever.
Better yet, you could just buy the entire jerk block set. You’d be back to those steel block prices, but now you’d have access to both pulling blocks and jerk blocks, and what a treat that would be!
Rogue isn’t the only company with wood jerk blocks for sale, but they do appear to be the best. Another alternative would be some Rhode Blocks; they look pretty decent too. Same concept with the top piece that always goes on top of the stackable pieces. Looks like they have a fairly long lead time though.

DC Blocks are stackable in 2″ increments pretty much as high as you want… that is assuming that you can afford them!
Finally, you’ve got what are supposed to be the other completely indestructible option; DC Blocks. These are 19″ long, 15½” wide, and 2″ high recycled and stackable plastic blocks. With the twelve block set you’d be able to adjust anywhere from the ground up to 12″ in 2″ increments, and that’s pretty cool.
Sadly, that set of twelve blocks will set you back nearly $600, and that’s just effin’ crazy for plastic. Anyway, I’m not suggesting these so much as just making you aware of their existence. Neat, but pricey as hell.
If you feel as though I was bit too brief and I’ve left something important out of this article, leave a comment. If you need help with your DIY pulling blocks, you can ask questions in the comments as well. Good luck, and please share this!


If somebody wanted an adjustable set, here’s a way to do it with roughly the same tools:
Make a bunch of 2″ thick picture frames until they stack to the height you want — you can add diagonal braces inside each frame if you want them to be extra strong.
Make a top piece like the Rogue Jerk block set but use the stall mat top like the DIY one above. Don’t attach the stall mat yet. I’d probably make this out of solid wood with layers rotated at 90 degrees for strength, and make it about 1.5″ thick or more before the stall mat and roll-off stops like on the Rogue wooden set — maybe make it so wood plus stall mat is the same height as the below layers for easy height calculations.
Stack all your pieces and drill four holes downward through the whole mess – either just somewhere near the corners or at an exact measured location if you want to be able to assemble the stack in any orientation (If you want them to be exact for stacking ease, drill the top piece to be exact then use it as a template to drill each lower layer one at a time instead of all stacked together — doing it this way you also don’t need special long drill bit as you would if you drilled the whole stack at once). Unless you got those holes into some exact spot, the rotation of each layer will become critical so mark the ends of all the pieces and number each layer before you take the stack apart so you can put them back together that same way. Use a scrap piece on the bottom when drilling so you don’t hit the floor. The size of the hole should match the size of some metal bar you can buy – you can’t always get all sizes at hardware stores so shop the metal before drilling the hole. Drill a test hole and check that you can reasonably get the bar into the hole – if not use a different drill bit.
Cut the metal bar into about 1.5″ lengths if you’re making 2″ layers (hacksaw, handheld grinder with cutoff blade, etc.). Debur the pieces with a grinder or file, or some power sander. Epoxy these bar pieces, four per layer, into the holes each of the picture frames that you built such that each layer, at least when rotated correctly, will interlock with the layer that goes above it. I’d suggest using a filled or “gel” epoxy instead of the runny regular hardware store kind. Avoid the “5-minute” if you can since the slower ones allow more time to work and are stronger.
Attach the stall mat with screws or glue.
You now have a stackable block system that is adjustable in 2″ segments — if you want, you can make some segments thicker so it takes fewer to make a tall stack (or zip-tie or screw several of the thinner layers together), or you can make them thinner if you want finer adjustment.
Power-Lift also has a cantilevered platform system for their racks – don’t know whether anyone else makes them. Potentially that sort of system might save a little space. Also, Rogue and Sorinex, at least, make strap systems that run between rack uprights and which could be used like blocks without messing the bar up at least much, as dropping onto a safety bar might. Finally, either a bar/cable system as described in a DVD from Atomic Athletic, or a forthcoming nylon strap system from Spud would let you keep the weights on the floor at the bottom of your lift with cables or straps to the bar at whatever your starting height is — the dynamics of the lift will be a bit different this way, depending on how much lateral movement there is in the lift. For partial deadlifts that’s probably not an issue, for example, whereas it might be for jerks.
That actually reminds me. I didn’t mention that I did indeed turn the second plywood piece 90 degrees before attaching it, much like you’d do with a true platform.
Thanks! New Weekend Project !!
Have fun! =p
DC Blocks are made in the USA from 100% recycled plastics. American made products are never cheap and DC Blocks are multi-functional. They are not just pulling blocks.
Am I missing an obvious reason that you have to attach all the layers? Can you make layer sets of 2×4’s and not attach the sets to scale the height as needed? Your box for example would be 3 sets and then the top layer.
Only because pulling blocks, especially in a garage gym type setting, don’t need the same versatility in height as jerk blocks do. If you choose to make individual, stacking layers, you introduce the issue of each layer bouncing and shifting around each time the bumpers land on the blocks. You can use more material and shape the layers in such a way that each layer fits into the layer above and below it, but it’s just not necessary for pulling blocks. The idea was to keep it affordable and to make and simple enough that anyone could put them together. If adjustable pulling blocks are needed, yes the design would need to be modified.
Keep in mind that even full-size jerk blocks if not constructed well have issues with each layer bouncing after bumper impact, and each section is about as heavy as these pulling blocks are. Cut that weight in half or in quarters and this issue will be even more pronounced. Of course there are all kinds of creative ways to go about reducing this bounce, but again, it was meant to be simple. I’ve been in many clubs that had blocks similar to these and everyone was just glad they were there even though none of them were adjustable. At least when you make them for yourself they can be made to any height you want.
See! I hadn’t even considered the bouncing and shifting, thanks. I think chest/toolbox style latches could be used to stop the bouncing… I wonder if they would hold up to shifting.
I’ve seen that done with jerk blocks. As long as each layer fit into the layer below it and couldn’t move laterally, then I can’t see why it wouldn’t also work with shorter pulling blocks.
I made these on the weekend, super easy to do (and I’m not very handyman like), they work great too. thanks for putting this out there for us, saved a bunch on money too!
Does anyone know of a way to sound proof this a little bit?
I don’t know what you could do. The whole dropping a bar onto boxes is going to be loud. They may be heavy enough to have mats attached to the bottoms as well, but I don’t know how much bouncing around the blocks would do at that point. I would imagine that could be annoying as well if they were moving around and still loud.
Not a perfect solution but you could use rubber stall mat on the bottom (similar concept as using it on top) and fill in between the cavities of the studs/blocks with expandable foam like Great Stuff
I built myself a variation of these pull blocks this weekend using 2x6s instead of 2x4s. I made it 27.5″ square, which is three supports on each layer and two empty slots. I made them “adjustable” by creating three “layers.” The top is 2x6s instead of plywood, so it is five 2x6s on top with a crossed layer of five 2x6s on bottom. This makes the top “layer.” The corners have 1.5″ “pocket” holes drilled into them with a spade drill bit, place 2.75″ from the x- and y-axis represented by the edge of the board. The other two “layers” are each three boards thick, made of three 2x6s crossed with two more layers of the same. There are similar “pockets” drilled into their bottom corners. The top of these these “layers” have another hole in their four corners, one that is 1″ in diameter (made with another spade drill bit). I cut a 1″ diameter dowel to 2.5″ lengths and pounded them into these holes on top of these middle “layers.” So now when I place the boxes on top of each other, the 1.5″ holes on the bottom of the layers lines up nigh-perfectly with the 1″ dowels on top and secures them in place. In this way, I can adjust the height of my box to be either 3″ (top layer only), 7.5″ (top layer and a middle layer) or 12″ (top layer and two middle layers).
That’s a good idea. You could build up more if you wanted too. I’ve had issues with mine being too short when used for miscellaneous things – belt squats for instance. Really wish I had gone with an adjustable build as well.
I just build a similar version with the 2x6s. I was planning on 2x4s, and when I got to Lowe’s, the 2x6s were cheaper than the 2x4s of the same length. I had to do some quick math, but ended up buying 3x 16′ boards and 3x 12′ boards (2″x6″) instead of 7x 16′ 2″x4″s. This probably saved my ~$20-30, and resulted in more wood per layer, increasing the durability and the weight. Overall, very satisfied so far. Only hitch I ran into was that the larger box of screws I bought was still not enough, but I had a small box in the same size that covered the remaining boards.
Yeah but they cannot be fun to move around. With 2x4s these things are heavy enough. But hey, if it’s not overly cumbersome then sounds like a winner.
To add 3 inches of height just replicate the bottom two layers of your current blocks (or bottom 4 layers for an additional 6 inches)
Then to connect them with your current blocks add two more 2 x 4’s on top of these new bases running lengthwise in the second and fourth position. They will fit in the gaps in the bottom of your original blocks (where you used 2 x 4 spacers when building). So the joining layer will be five 24½” 2 x 4’s, three being from the bottom of the old blocks and two from the top of the boosters. Just flip the old blocks upside down and start by positioning the two 2 x 4’s from the interconnecting layer in their slots (the empty second and fourth position in bottom of old block) to ensure fit and proper spacing. Then work downward adding the 4 shorter cross pieces but screw them only to these two 2 x 4’s. Then a minimum of 3 more long pieces. Add layers until the booster block is the desired height. .
thank you for this guide. very simple
of course. thank you )
This may be a silly question, but if I only wanted the blocks to be about 4 inches tall, why not just buy a single sheet of plywood and have it cut into twelve 16×24 inch pieces and then nail 6 pieces together to make 4.5 inch blocks? Would it be less sturdy than filling the space with 2x4s? Would it be heavier and therefore more of an annoyance to move around? Thanks in advance!
It would be heavier, but it would be a lot easier to make. Especially if you got Home Depot to rip the board into smaller pieces (or all of the pieces). Seriously, when just doing short blocks like that it probably matters not how it’s done, though I’d use screws over nails if I were you, and a little bit of liquid nails in-between each piece.
Hi, can you let me know what the height of your blacks was?
Totally overlooked this comment, Anthony. I’m so sorry. They are about 11″ high.
Thanks so much for the information. I made some adjustments to our blocks to make them easier for us to move around and to use (the blocks can become heavy). I put a handle on one end and then added wheels on the other, as well as some wood blocks on that side that are the same height as the wheels, so the blocks can be easily rolled into position and then rolled back to the wall and stood up to be stored (the wood blocks keeps the whole thing from slipping when turned up on the end with the wheels). We also put strips on the top to prevent the weights from rolling off. The last modification – which I took from one of the comments – was to add another level of 2×4’s by just putting two 2×4’s on top of the extra level that fit in between the spaces of the bottom level of our blocks. This gives us an easy adjustment between my wife and my desired height, you just set the block right onto the extra level and when I am done it just slips off.
They sound nice. I wish this platform allowed uploading of images. I’d love to see them.
Hey I’m just wondering how strong you think these are? Could I drop a barbell in the 500-600lb range on it?
Probably you could, but I don’t know for how long. I suspect if this is going to be a normal thing for you that you just buy adjustable metal pulling blocks. You may even find those used if you live in a big enough market.